今天编程学习网为大家讲解基于python flask框架搭建web以及flask后台与前端(html)交互的两种方法,有需要的小伙伴可以参考一下:
方法1: 使用flask-wtf 提供的表单
用常见的登录为例:
// An highlighted block
from flask_wtf import Form
class LoginForm(Form): # 登录表单
ROLE = SelectField('角色', choices=[('s', '管理员'), ('n', '用户')], render_kw={"placeholder": "输入你的用户名", "sty"
"le": "background:url(/static/user."
"png) no-repeat 15px center;t"
"ext-indent: 28px"})
email = StringField('', validators=[Required(), Length(1, 64),
Email()], render_kw={"placeholder": "请输入邮箱",
"style": "background:url(/static/email"
".png) no-repeat 15px center;"
"text-indent: 28px"})
password = PasswordField('', validators=[Required()], render_kw={"placeholder": "输入你的密码", "style": "back"
"ground:url(/static/password.pn"
"g) no-repeat 15px center;text-"
"indent: 28px"})
verify_code = StringField('', validators=[Required()], render_kw={"placeholder": "验证码", "style": "back"
"ground:url(/static/password.pn"
"g) no-repeat 15px center;text-"
"indent: 28px"})
remember_me = BooleanField('记住密码')
submit = SubmitField('登录')
@auth.route('/login', methods=['GET', 'POST']) # 登陆路由
def login():
form = LoginForm()
if form.validate_on_submit():
user = User.query.filter_by(email=form.email.data).first()
if session.get('image').lower()!=form.verify_code.data.lower():
flash('验证码错误')
return render_template('auth/login.html', form=form)
if user is not None and user.verify_password(form.password.data) and (user.ROLE == form.ROLE.data): # user.ROLE == form.ROLE.data:
login_user(user, form.remember_me.data)
return redirect(request.args.get('next') or url_for('main.index'))
flash('邮箱或者密码错误,请检查后再试.')
return render_template('auth/login.html', form=form)
// An highlighted block
{% extends "base.html" %}
{% import "bootstrap/wtf.html" as wtf %}
{% block title %}Flasky - Login{% endblock %}
{% block page_content %}
<div class="Login">
<div class="page-header">
<h1>登录</h1>
</div>
<div class="col-md-4">
{{ wtf.quick_form(form) }}
<img class="verify_code" src="/auth/code " onclick="this.src='/auth/code?'+ Math.random()">
</div>
<div class="container">
<div class="row">
<br>
<br>
<br>
<div class="col-md-12 col-md-offset-0">
<a href="{{ url_for('auth.register') }}"
class = "btn btn-default">注册</a>
</div>
</div>
</div>
</div>
{% endblock %}
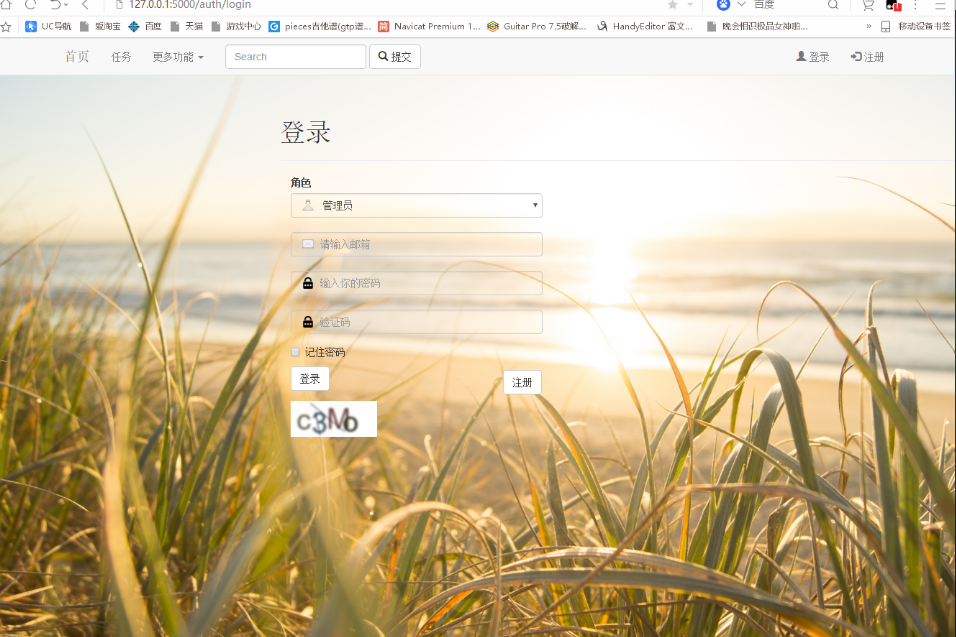
结果如图:

方法2 直接使用HTML中的form
html代码如下:
<html><head>
<title>Purple_loginform Website Template | Home :: w3layouts</title>
<link href="/static/css/style.css" rel="stylesheet" type="text/css" media="all" />
<meta http-equiv="Content-Type" content="text/html; charset=utf-8" />
<meta name="viewport" content="width=device-width, initial-scale=1, maximum-scale=1">
<meta http-equiv="Content-Type" content="text/html; charset=utf-8" />
</head>
<body>
<!-- contact-form -->
<div class="message warning">
<div class="inset">
<div class="login-head">
<h1>Login Form</h1>
<div class="alert-close"> </div>
</div>
<form action="{{ url_for('auth.login1') }}" method="post">
<li>
<input type="text" name="email" class="text" value="Username" onfocus="this.value = '';" onblur="if (this.value == '') {this.value = 'Username';}"><a href="#" class=" icon user"></a>
</li>
<div class="clear"> </div>
<li>
<input type="password" name="password" value="Password" onfocus="this.value = '';" onblur="if (this.value == '') {this.value = 'Password';}"> <a href="#" class="icon lock"></a>
</li>
<div class="clear"> </div>
<div class="submit">
<input type="submit" value="Sign in" >
<h4><a href="#">Lost your Password ?</a></h4>
<div class="clear"> </div>
</div>
</form>
</div>
</div>
</div>
<div class="clear"> </div>
<!--- footer --->
<div class="footer">
<p>Copyright © 2019.</p>
</div>
</body>
</html>
@auth.route('/login1', methods=['GET', 'POST'])
def login1():
if request.method == 'GET':
return render_template('auth/login1.html')
if request.method == 'POST':
count = request.form["email"]
#count = request.form.get("Username")
password = request.form["password"]
#password=request.form.get("pass")
user = User.query.filter_by(email=count).first()
if user is not None and user.verify_password(password): # user.ROLE == form.ROLE.data:
login_user(user)
return redirect(request.args.get('next') or url_for('main.index'))
flash('邮箱或者密码错误,请检查后再试.')
return render_template('auth/login1.html')
@auth.route('/login1', methods=['GET', 'POST'])
def login1():
效果如图:


服务器状态200表示登录成功
以上就是flask与html交互数据比较简单的两种方法
以上就是“flask与html是什么关系? flask与html交互数据 比较的两种方法!”的详细内容,想要了解更多Python教程欢迎持续关注编程学习网
扫码二维码 获取免费视频学习资料

- 本文固定链接: http://www.phpxs.com/post/10227/
- 转载请注明:转载必须在正文中标注并保留原文链接
- 扫码: 扫上方二维码获取免费视频资料

